通用图像分割模型:Segment Anything Model(SAM)训练教程
通用图像分割模型:Segment Anything Model(SAM)训练教程
一 概述
SAM是由Meta的FAIR实验室发布的图像分割模型,具有十分强大的零样本泛化能力,模型官网:https://segment-anything.com/。读者可以自行前往官网查看模型效果
二 快速开始
2.1 准备环境
创建conda环境:
本教程选择pytorch作为训练框架,要注意Python与PyTorch的版本对应。
conda create -n sam python=3.9 -c https://mirrors.tuna.tsinghua.edu.cn/anaconda/pkgs/main/激活环境:
conda activate sam下载项目源码:
wget https://mirrors.aheadai.cn/pkgs/segment-anything-main.zip
# 或者也可以从官网去下载,官网链接:https://github.com/facebookresearch/segment-anything
解压:
unzip segment-anything-main.zip 安装依赖:
cd segment-anything-main
pip install -e . -i https://pypi.tuna.tsinghua.edu.cn/simple
安装CUDA(以CUDA11.8为例)
如何安装合适版本的Pytorch参考https://docs.aheadai.cn/196.html
wget https://developer.download.nvidia.com/compute/cuda/11.8.0/local_installers/cuda_11.8.0_520.61.05_linux.run
sh cuda_11.8.0_520.61.05_linux.run
export PATH=/usr/local/cuda-11.8/bin:$PATH
export LD_LIBRARY_PATH=/usr/local/cuda-11.8/lib64:$LD_LIBRARY_PATH
安装pytorch
pip install torch==1.10.1+cu113 torchvision==0.11.2+cu113 torchaudio==0.10.1 -f https://download.pytorch.org/whl/cu113/torch_stable.html -i https://pypi.mirrors.ustc.edu.cn/simple安装其他依赖:
pip install opencv-python pycocotools matplotlib onnxruntime onnx tqdm monai scikit-image opencv-python-headless
 --default-time 99999 -i https://pypi.mirrors.ustc.edu.cn/simple
【可选】将刚刚新建的sam环境添加到jupyter中
pip install ipykernel
python -m ipykernel install --user --name=sam
2.2 训练教程
下载数据集:
cd .. #先回到上一级地址或任何你想存放数据压缩包的地方,目前还在segment-anything-main里面
wget https://mirrors.aheadai.cn/data/SAM-dataset-551images.zip
下载初始权重文件:(这里选择的是sam_vit_h_4b8939.pth)
wget https://mirrors.aheadai.cn/pkgs/sam_vit_h_4b8939.pth
或前往官网自行下载:https://dl.fbaipublicfiles.com/segment_anything/sam_vit_h_4b8939.pth
下载代码:
wget https://mirrors.aheadai.cn/scripts/sam-gen-npz.py
wget https://mirrors.aheadai.cn/scripts/sam-train.py
# 根据代码中的提示信息,修改相应存储路径
解压数据集:
unzip SAM-dataset-551images.zip生成npz
python sam-gen-npz.py
# 注意修改代码中的路径
开始训练:
python sam-train.py如果报错:
Traceback (most recent call last): File "/online1/ssd/qiql/run-sam/model/train.py", line 141, inmask_predictions, _ = sam_model.module.mask_decoder( File "/home/qiql/.conda/envs/sam/lib/python3.9/site-packages/torch/nn/modules/module.py", line 1102, in _call_impl return forward_call(*input, **kwargs) File "/home/qiql/segment-anything-main/segment_anything/modeling/mask_decoder.py", line 94, in forward masks, iou_pred = self.predict_masks( File "/home/qiql/segment-anything-main/segment_anything/modeling/mask_decoder.py", line 127, in predict_masks src = src + dense_prompt_embeddings RuntimeError: The size of tensor a (9216) must match the size of tensor b (96) at non-singleton dimension 0 或:
Traceback (most recent call last):
File "/root/autodl-tmp/run-sam/sam-train.py", line 152, in <module>
mask_predictions, _ = sam_model.module.mask_decoder(
File "/root/miniconda3/envs/sam/lib/python3.9/site-packages/torch/nn/modules/module.py", line 1102, in _call_impl
return forward_call(*input, **kwargs)
File "/root/autodl-tmp/run-sam/segment-anything-main/segment_anything/modeling/mask_decoder.py", line 94, in forward
masks, iou_pred = self.predict_masks(
File "/root/autodl-tmp/run-sam/segment-anything-main/segment_anything/modeling/mask_decoder.py", line 126, in predict_masks
src = torch.repeat_interleave(image_embeddings, tokens.shape[0], dim=0)
RuntimeError: CUDA out of memory. Tried to allocate 36.00 GiB (GPU 0; 23.68 GiB total capacity; 2.83 GiB already allocated; 18.71 GiB free; 2.89 GiB reserved in total by PyTorch) If reserved memory is >> allocated memory try setting max_split_size_mb to avoid fragmentation.  See documentation for Memory Management and PYTORCH_CUDA_ALLOC_CONF
解决办法:
找到SAM源码中的 mask_decoder.py 文件,找到以下代码块:
src = torch.repeat_interleave(image_embeddings, tokens.shape[0], dim=0) # 直接扩展,无条件判断将其修改为:
if image_embeddings.shape[0] != tokens.shape[0]:  # 动态判断批次大小是否相等
 src = torch.repeat_interleave(image_embeddings, tokens.shape[0], dim=0)
else:
 src = image_embeddings  # 如果大小相等,直接使用image_embeddings
这里做一下简单的解释:
原代码中,无条件扩展 image_embeddings,即使在 image_embeddings 和 tokens 大小已经匹配时也进行扩展,导致张量大小不匹配错误。此外,当 batch_size 较大时,这种不必要的扩展会显著增加显存占用,可能引发显存不足的问题。修改后的代码通过动态判断批次大小,仅在必要时进行扩展,避免了张量大小不匹配和显存不足的错误,从而支持更大的 batch_size,同时优化了显存使用效率。*
三 数据处理
3.1 问题背景
SAM的初始模型,具有一些基本的图像分割能力,但是当图像灰度接近时效果就会变差,比如以下这张图:

如果需要将里面的区域提取出来,如下图:
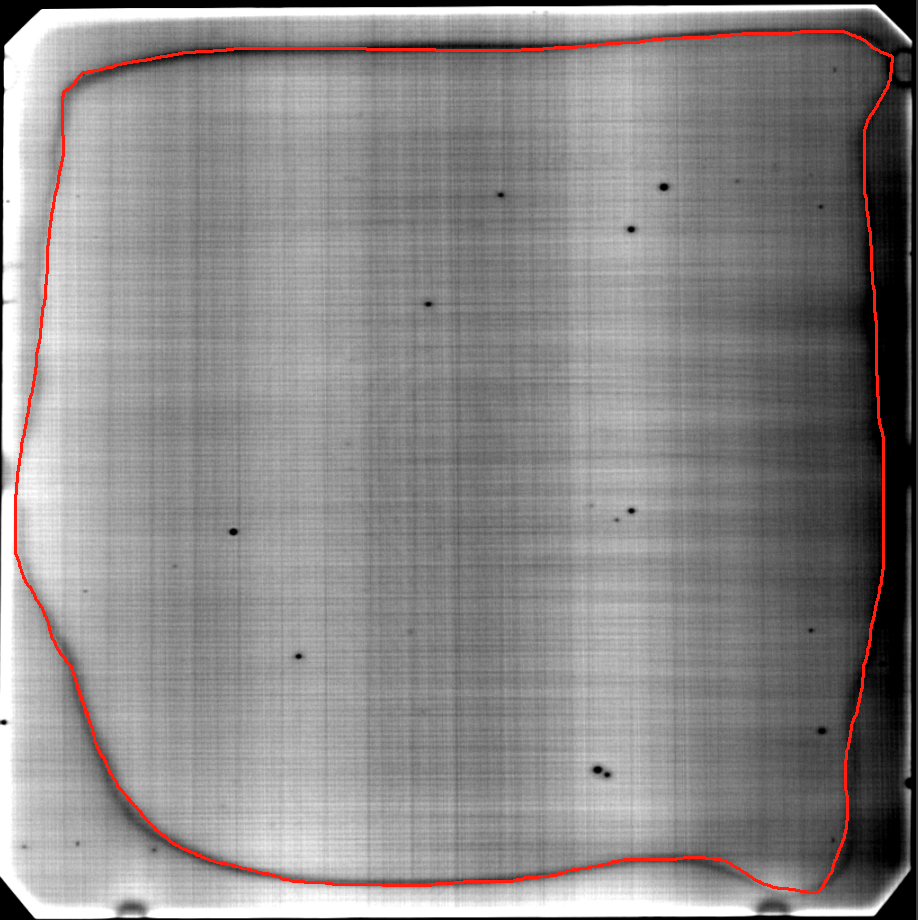
使用传统的算法很难做到,同样的,使用初始权重的SAM模型也很难做到,所以需要使用自己的数据集进行二次训练,或者称之为微调
3.2 数据标注
首先,需要准备一些数据,笔者准备了551张原图,使用Labelme进行手动标注。事实上,在SAM发布之后,有一些教程可以搭建基于SAM的标注流程,可以加快标注的速度,Labelme的安装过程可以参考教程:https://blog.csdn.net/m0_62473142/article/details/134316259
但由于SAM模型本身对这些工业图片的分割效果就不好,所以笔者没有采用SAM用来辅助标注。
标注过程如下:
- 点击菜单栏的创建多边形
- 选点落在图片中的黑色轮廓上,所有点首位相连即该图片标注完毕
- 自定义标签名,后续所有图片都应该是这个标签名
3.3 json转mask
做完数据标注后,得到的都是json文件,但训练SAM的过程中,需要的是图片,所以需要把json转为抠出来的图片
转换代码:
import os
import json
from PIL import Image, ImageDraw

source_directory = r'./data/json'
target_directory = r'./data/mask'

# 确保目标目录存在
os.makedirs(target_directory, exist_ok=True)

# 遍历源目录中的所有文件
for filename in os.listdir(source_directory):
    if filename.endswith('.json'):
        json_path = os.path.join(source_directory, filename)

        # 加载JSON文件
        with open(json_path, 'r') as file:
            data = json.load(file)

        # 创建一个与原图像相同大小的空白图像
        width, height = data['imageWidth'], data['imageHeight']
        mask = Image.new('L', (width, height), 0)

        # 对于JSON中的每个标注
        for shape in data['shapes']:
            polygon = [tuple(point) for point in shape['points']]
            ImageDraw.Draw(mask).polygon(polygon, outline=1, fill=255)

        # 构建目标文件路径并保存掩码图像
        mask_filename = filename.replace('.json', '.bmp')
        mask_path = os.path.join(target_directory, mask_filename)
        mask.save(mask_path)
做完上面的操作之后,按照本文第二节中介绍的操作,就可以开始训练了,训练得到的bestSAM.pth
3.4 比较结果
示例代码:
#比较微调后模型和原始模型分割效果,单个图像
os.environ['CUDA_VISIBLE_DEVICES'] = '0,1,2,3'
model_type = 'vit_h'
checkpoint = './model/sam_vit_h_4b8939.pth'
checkpoint1 = './model/bestSAM.pth'
device = 'cuda:2'
device1 = 'cuda:3'
sam_model_orig = sam_model_registry[model_type](checkpoint=checkpoint)
sam_model_orig.to(device)
sam_model_orig = torch.nn.DataParallel(sam_model_orig, device_ids=[0, 1, 2, 3])

sam_model = sam_model_registry[model_type](checkpoint=checkpoint1)
sam_model.to(device1)
sam_model = torch.nn.DataParallel(sam_model, device_ids=[0, 1, 2, 3])

from segment_anything import sam_model_registry, SamPredictor
predictor_tuned = SamPredictor(sam_model.module)
predictor_original = SamPredictor(sam_model_orig.module)

image = cv2.imread('./data/ALD-dataset-all/after_FFT/5mchs.bmp')

predictor_tuned.set_image(image)
predictor_original.set_image(image)

input_bbox = np.array(bbox_coords[keys[0]])

input_point = np.array([[180, 180]])
input_label = np.array([1])

masks_tuned, _, _ = predictor_tuned.predict(
    point_coords=input_point,
    point_labels=input_label,
    box=input_bbox,
    multimask_output=True,
)

masks_orig, _, _ = predictor_original.predict(
    point_coords=input_point,
    point_labels=input_label,
    box=input_bbox,
    multimask_output=True,
)

%matplotlib inline
_, axs = plt.subplots(1, 2, figsize=(25, 25))

axs[0].imshow(image)
show_mask(masks_tuned[0], axs[0])
show_box(input_bbox, axs[0])
axs[0].set_title('Mask with Tuned Model', fontsize=26)
axs[0].axis('off')

axs[1].imshow(image)
show_mask(masks_orig[0], axs[1])
show_box(input_bbox, axs[1])
axs[1].set_title('Mask with Untuned Model', fontsize=26)
axs[1].axis('off')

plt.show()
如果效果不达预期,可以尝试增加训练的epoch,或者增加数据集数量,或者更换初始权重文件,SAM官方一共提供了三个初始权重文件
评论